在第三部分中,我们创建了一个搜索信号的基本系统,但该系统基于一小组指标和一组简单的搜索规则。 另外,我收到了一些可用性的改进建议,能在交易监视器的可视部分进行。 这就是我们将在本部分中要实现的。
为交易信号的创建和编辑补充逻辑,即扩展了可用指标集合。 以前,我们只能用 MetaTrader 5 的标准指标集合。 现在,我们有了运用自定义指标进行计算的可能。 我们以上一部分中的项目为基础。 它可以从文章附件下载。 在这一部分中,我们不得不修改在第三部分中研究的基类方法的运算算法。 所有的修改和补充都将附带相应的说明。
我们先从信号添加和编辑窗口中选择自定义指标开始。 在我们的项目 SetWindow.mqh 文件中提供此窗口实现。 打开该文件,然后找到 CreateIndicatorType() 方法。 修改应确定在此文件中实现。
//+------------------------------------------------------------------+
//| Creates a drop-down menu with indicator types                    |
//+------------------------------------------------------------------+
bool CProgram::CreateIndicatorType(const int x_gap,const int y_gap)
{
//--- Pass the object to the panel
   m_indicator_type.MainPointer(m_set_window);
//---
#define SIZE 10
//--- Array of the item values in the list view
   string pattern_names[SIZE]=
   {
      "ATR","CCI","DeMarker","Force Ind","WPR","RSI","Momentum","ADX","ADX Wilder","Custom"
   };
//--- Set up properties before creation
   m_indicator_type.XSize(200);
   m_indicator_type.YSize(26);
   m_indicator_type.LabelYGap(4);
   m_indicator_type.ItemsTotal(SIZE);
   m_indicator_type.Font(m_base_font);
   m_indicator_type.FontSize(m_base_font_size);
   m_indicator_type.BackColor(m_background);
   m_indicator_type.GetButtonPointer().Font(m_base_font);
   m_indicator_type.GetButtonPointer().FontSize(m_base_font_size);
   m_indicator_type.GetButtonPointer().BackColor(clrWhite);
   m_indicator_type.GetButtonPointer().XGap(100);
   m_indicator_type.GetButtonPointer().XSize(100);
   m_indicator_type.GetListViewPointer().Font(m_base_font);
   m_indicator_type.GetListViewPointer().FontSize(m_base_font_size);
   m_indicator_type.GetListViewPointer().ItemYSize(25);
   m_indicator_type.GetListViewPointer().YSize(200);
//--- Save the item values in the combobox list view
   for(int i=0; i<SIZE; i++)
      m_indicator_type.SetValue(i,pattern_names[i]);
//--- Get the list view pointer
   CListView *lv=m_indicator_type.GetListViewPointer();
//--- Set the list view properties
   lv.LightsHover(true);
   m_indicator_type.SelectItem(1);
//--- Create the control
   if(!m_indicator_type.CreateComboBox("Indicator Type",x_gap,y_gap))
      return(false);
//--- Add the object to the common array of the object groups
   CWndContainer::AddToElementsArray(1,m_indicator_type);
   return(true);
}
现在研究与之前的版本相比发生了哪些变化。 首先,我们添加了 SIZE 宏替换,其代表下拉列表中的元素数量。 因此,我们可在单一地方更改列表长度,而无需在所有代码部分里进行替换。 然后在末尾添加一个新的列表项:Custom。 修改如下图例 1 所示。

图例 1 添加选择自定义指标的项目。
现在,我们添加新的界面元素,从而可以设置和使用指标。 我们需要根据 iCustom() 函数参数进行修改,从而调用自定义指标的计算部分。 这些包括品种名称,周期,已编译 *.ex5 指标文件的路径,以及以逗号分隔的指标参数列表。
int  iCustom(
   string           symbol,     // symbol name
   ENUM_TIMEFRAMES  period,     // period
   string           name        // folder/custom indicator_name
   ...                          // the list of indicator input parameters
   );
品种名称和时间帧将用来自初始应用程序设置前两步中选择的数值替换。 只是,用户必须自行设置指标路径和参数列表。 为此目的,需要添加两个其他字段。 在 CProgram 基类中添加两个新变量和一个方法:
   CTextEdit         m_custom_path;
   CTextEdit         m_custom_param;

   bool              CreateCustomEdit(CTextEdit &text_edit,const int x_gap,const int y_gap,const string default_text);
由于该方法是在交易信号创建/编辑窗口中应用的,因此请在 SetWindow.mqh 文件中实现该方法:
//+------------------------------------------------------------------+
//| Input field for a custom indicator                               |
//+------------------------------------------------------------------+
bool CProgram::CreateCustomEdit(CTextEdit &text_edit,const int x_gap,const int y_gap,const string default_text)
{
//--- Save the pointer to the main control
   text_edit.MainPointer(m_set_window);
//--- Properties
   text_edit.XSize(100);
   text_edit.YSize(24);
   text_edit.Font(m_base_font);
   text_edit.FontSize(m_base_font_size);
   text_edit.GetTextBoxPointer().AutoSelectionMode(true);
   text_edit.GetTextBoxPointer().XGap(1);
   text_edit.GetTextBoxPointer().XSize(325);
   text_edit.GetTextBoxPointer().DefaultTextColor(clrSilver);
   text_edit.GetTextBoxPointer().DefaultText(default_text);
   text_edit.GetTextBoxPointer().BorderColor(clrBlack);
//--- Create the control
   if(!text_edit.CreateTextEdit("",x_gap,y_gap))
      return(false);
   text_edit.IsLocked(true);
//--- Add the object to the common array of the object groups
   CWndContainer::AddToElementsArray(1,text_edit);
   return(true);
}
利用 CreateCustomEdit() 方法创建两个输入字段。 在同一文件的 CreateSetWindow() 方法主体中,找到 Selected indicator settings 部分,并向其中添加以下代码:
   if(!CreateCustomEdit(m_custom_path,240,22+10+2*(25+10),"Enter the indicator path"))
      return(false);
   if(!CreateCustomEdit(m_custom_param,240,22+10+3*(25+10),"Enter indicator parameters separated by commas"))
      return(false);
结果就是,在设置窗口中将出现两个输入字段,如图例 2 所示。
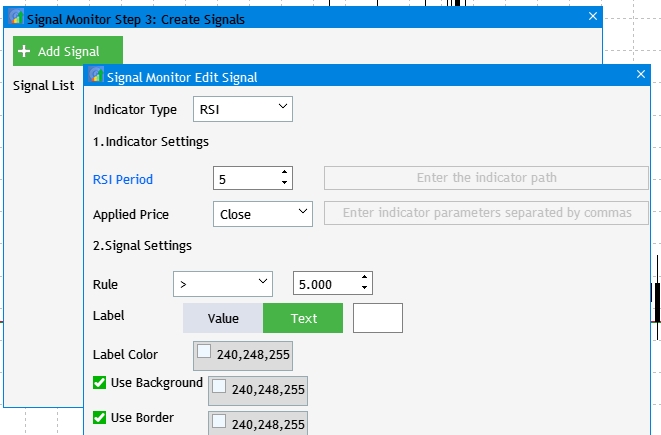
图例 2 为自定义指标的设置添加输入字段。
在此开发阶段,它们处于非激活状态。 这是因为其可用性严格依据所选指标类型,即,只有在下拉列表中选择了 Custom 之时,该项才可用。 为了实现该项任务,我们修改 RebuildParameters() 方法。 但首先,转到 OnEvent() 方法中的下拉列表项选择事件部分,然后添加指标类型列表甄选事件的检查。
//--- Selecting an item in the combobox drop-down list
   if(id==CHARTEVENT_CUSTOM+ON_CLICK_COMBOBOX_ITEM)
   {
      //--- Indicator type
      if(lparam==m_indicator_type.Id())
         RebuildParameters(m_indicator_type.GetListViewPointer().SelectedItemIndex());
   }
现在修改 RebuildParameters() 方法,从而在选择每个可用指标时,显示其相关设置。 进而,对于自定义指标,这将令路径和参数输入字段处于活动状态。
//+------------------------------------------------------------------+
//|                                                                  |
//+------------------------------------------------------------------+
void CProgram::RebuildParameters(int index)
{
   switch(index)
   {
   case  0:
      m_period_edit.LabelText("ATR Period");
      m_applied_price.Hide();
      m_custom_param.IsLocked(true);
      m_custom_path.IsLocked(true);
      break;
   case  1:
      m_period_edit.LabelText("CCI Period");
      m_applied_price.Show();
      m_custom_param.IsLocked(true);
      m_custom_path.IsLocked(true);
      break;
   case  2:
      m_period_edit.LabelText("DeMarker Period");
      m_applied_price.Hide();
      m_custom_param.IsLocked(true);
      m_custom_path.IsLocked(true);
      break;
   case  3:
      m_period_edit.LabelText("Force Index Period");
      m_applied_price.Hide();
      m_custom_param.IsLocked(true);
      m_custom_path.IsLocked(true);
      break;
   case  4:
      m_period_edit.LabelText("WPR Period");
      m_applied_price.Hide();
      m_custom_param.IsLocked(true);
      m_custom_path.IsLocked(true);
      break;
   case  5:
      m_period_edit.LabelText("RSI Period");
      m_applied_price.Show();
      m_custom_param.IsLocked(true);
      m_custom_path.IsLocked(true);
      break;
   case  6:
      m_period_edit.LabelText("Momentum Period");
      m_custom_param.IsLocked(true);
      m_custom_path.IsLocked(true);
      break;
   case  7:
      m_period_edit.LabelText("ADX Period");
      m_applied_price.Hide();
      m_custom_param.IsLocked(true);
      m_custom_path.IsLocked(true);
      break;
   case  8:
      m_period_edit.LabelText("ADXW Period");
      m_applied_price.Hide();
      m_custom_param.IsLocked(true);
      m_custom_path.IsLocked(true);
      break;
   case  9:
      m_period_edit.LabelText("Buffer Number");
      m_applied_price.Hide();
      m_custom_param.IsLocked(false);
      m_custom_path.IsLocked(false);
      break;
   default:
      m_period_edit.LabelText("Ind Period");
      m_applied_price.Hide();
      m_custom_param.IsLocked(true);
      m_custom_path.IsLocked(true);
      break;
   }
   m_period_edit.Update(true);
}
现在,项目编译应产生以下结果:
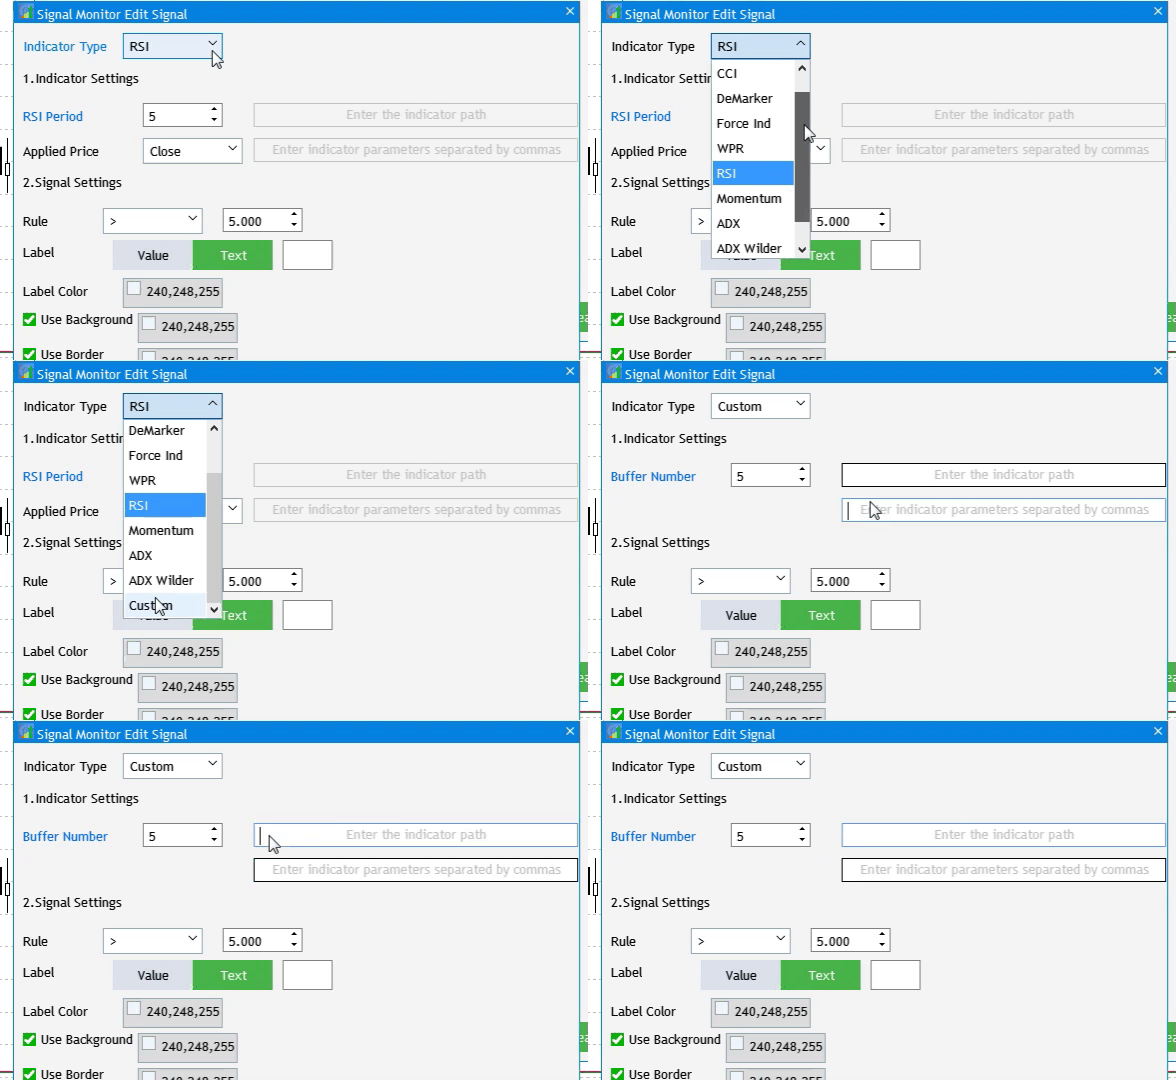
图例 3 为自定义指标添加输入字段。
下一步是补充“添加信号事件”按钮的单击。 按下时,将指标选择和设置设为默认值。
      //--- Add Signal button click event
      if(lparam==m_add_signal.Id())
      {
         if(m_total_signals>4)
         {
            MessageBox("Maximum number of signals is 5","Signal Monitor");
            return;
         }
         m_set_window.OpenWindow();
         RebuildParameters(1);
         m_number_signal=-1;
         RebuildTimeframes();
         m_new_signal.LabelText("Add");
         m_new_signal.Update(true);
         m_indicator_type.SelectItem(1);
         m_indicator_type.GetButtonPointer().Update(true);
      }
在现有保存信号设置的算法里,适配新控件(输入字段)之前,我们先要扩展交易信号搜索规则系统。 这将导致添加新的界面元素。 不过,我们每次扩展设置系统时都没有修改保存设置的算法。 更具逻辑性的解决方案是添加所有新设置和控件元素,然后修改保存信号搜索参数集合的方法。
此刻,交易监控器可基于不等式创建信号。 它表示大于、小于或等于某个数字的条件。 然而,这种选择并不一定准确地反映所需的信号。 例如,振荡器指标有时更适合在特定数值范围内使用。 这就是我们即将要实现的。 首先,有必要在之前的规则设置系统和新的规则设置系统之间添加一个开关。 应增加含有两种规则设置类型的新下拉列表:Compare 和 Interval 。
转到 CProgram 基类并添加一个新变量,即 CСombobox 类的实例,并创建实现 UI 元素的方法:
CComboBox         m_rule_interval;

bool              CreateRuleInterval(const int x_gap,const int y_gap);
该方法实现应添加到 SetWindow.mqh 文件中,因为该下拉列表属于设置窗口。
//+------------------------------------------------------------------+
//|                                                                  |
//+------------------------------------------------------------------+
bool CProgram::CreateRuleInterval(const int x_gap,const int y_gap)
{
//--- Pass the object to the panel
   m_rule_interval.MainPointer(m_set_window);
//--- Array of the item values in the list view
   string pattern_names[2]=
   {
      "Compare","Interval",
   };
//--- Set up properties before creation
   m_rule_interval.XSize(160);
   m_rule_interval.YSize(26);
   m_rule_interval.LabelYGap(4);
   m_rule_interval.ItemsTotal(2);
   m_rule_interval.Font(m_base_font);
   m_rule_interval.FontSize(m_base_font_size);
   m_rule_interval.BackColor(m_background);
   m_rule_interval.GetButtonPointer().Font(m_base_font);
   m_rule_interval.GetButtonPointer().FontSize(m_base_font_size);
   m_rule_interval.GetButtonPointer().BackColor(clrWhite);
   m_rule_interval.GetButtonPointer().XGap(90);
   m_rule_interval.GetButtonPointer().XSize(80);
   m_rule_interval.GetListViewPointer().Font(m_base_font);
   m_rule_interval.GetListViewPointer().FontSize(m_base_font_size);
   m_rule_interval.GetListViewPointer().ItemYSize(26);
//--- Save the item values in the combobox list view
   for(int i=0; i<2; i++)
      m_rule_interval.SetValue(i,pattern_names[i]);
//--- Get the list view pointer
   CListView *lv=m_rule_interval.GetListViewPointer();
//--- Set the list view properties
   lv.LightsHover(true);
   m_rule_interval.SelectItem(0);
//--- Create the control
   if(!m_rule_interval.CreateComboBox("Rule",x_gap,y_gap))
      return(false);
//--- Add the object to the common array of the object groups
   CWndContainer::AddToElementsArray(1,m_rule_interval);
   return(true);
}
新的 “Interval” 规则应具有上限和下限,因此需添加一个额外的字段以便输入数值。 前一个将用作上限值,新字段将用于下限值。 还必须为指标(例如 WPR)提供指定负值的可能性。 在这种情况下,上限和下限可进行切换。 为输入更低周期的字段,需要创建单独方法,为避免这种必要性,简单地修改负责现有输入字段的当前变量和 CreateRule() 方法。 该变量将成为一个数组:
CTextEdit m_rule_value[2]; 在该方法中,添加一个新参数,该参数来接收 CTextEdit 类的实例引用。
bool CreateRuleValue(CTextEdit &text_edit,const int x_gap,const int y_gap);
相应地修改方法的实现。
//+------------------------------------------------------------------+
//|                                                                  |
//+------------------------------------------------------------------+
bool CProgram::CreateRuleValue(CTextEdit &text_edit,const int x_gap,const int y_gap)
{
//--- Save the pointer to the main control
   text_edit.MainPointer(m_set_window);
//--- Properties
   text_edit.XSize(80);
   text_edit.YSize(24);
   text_edit.GetTextBoxPointer().XGap(1);
   text_edit.LabelColor(C'0,100,255');
   text_edit.Font(m_base_font);
   text_edit.FontSize(m_base_font_size);
   text_edit.MaxValue(999);
   text_edit.StepValue(0.1);
   text_edit.MinValue(-999);
   text_edit.SetDigits(3);
   text_edit.SpinEditMode(true);
//--- Create the control
   if(!text_edit.CreateTextEdit("",x_gap,y_gap))
      return(false);
   text_edit.SetValue(string(5));
   text_edit.GetTextBoxPointer().AutoSelectionMode(true);
//--- Add the object to the common array of the object groups
   CWndContainer::AddToElementsArray(1,text_edit);
   return(true);
}
另外,修改现有的 CreateRule() 方法的某些值:
//+------------------------------------------------------------------+
//|                                                                  |
//+------------------------------------------------------------------+
bool CProgram::CreateRule(const int x_gap,const int y_gap)
{
//--- Pass the object to the panel
   m_rule_type.MainPointer(m_set_window);
//--- Array of the item values in the list view
   string pattern_names[5]=
   {
      ">",">=","==","<","<="
   };
//--- Set up properties before creation
   m_rule_type.XSize(80);
   m_rule_type.YSize(26);
   m_rule_type.LabelYGap(4);
   m_rule_type.ItemsTotal(5);
   m_rule_type.Font(m_base_font);
   m_rule_type.FontSize(m_base_font_size);
   m_rule_type.BackColor(m_background);
   m_rule_type.GetButtonPointer().Font(m_base_font);
   m_rule_type.GetButtonPointer().FontSize(m_base_font_size);
   m_rule_type.GetButtonPointer().BackColor(clrWhite);
   m_rule_type.GetButtonPointer().XGap(1);
   m_rule_type.GetButtonPointer().XSize(80);
   m_rule_type.GetListViewPointer().Font(m_base_font);
   m_rule_type.GetListViewPointer().FontSize(m_base_font_size);
   m_rule_type.GetListViewPointer().ItemYSize(26);
//--- Save the item values in the combobox list view
   for(int i=0; i<5; i++)
      m_rule_type.SetValue(i,pattern_names[i]);
//--- Get the list view pointer
   CListView *lv=m_rule_type.GetListViewPointer();
//--- Set the list view properties
   lv.LightsHover(true);
   m_rule_type.SelectItem(0);
//--- Create the control
   if(!m_rule_type.CreateComboBox("",x_gap,y_gap))
      return(false);
//--- Add the object to the common array of the object groups
   CWndContainer::AddToElementsArray(1,m_rule_type);
   return(true);
}
现在,在 CreateSetWindow() 方法中找到条件设置部分,并按如下所示修改代码:
//--- Condition settings
   if(!CreateRuleValue(m_rule_value[0],200,22+10+5*(25+10)))
      return(false);
   if(!CreateRuleValue(m_rule_value[1],300,22+10+5*(25+10)))
      return(false);
   if(!CreateRule(200,22+10+5*(25+10)))
      return(false);
   if(!CreateRuleInterval(10,22+10+5*(25+10)))
      return(false);
这些修改令您可以重新配置现有界面元素的位置,并添加新的元素。 结果应如图例 4 所示。 不过,如果您尝试从规则模式 Compare 切换到 Interval ,那么目前没有任何效果。 我们来修复它。
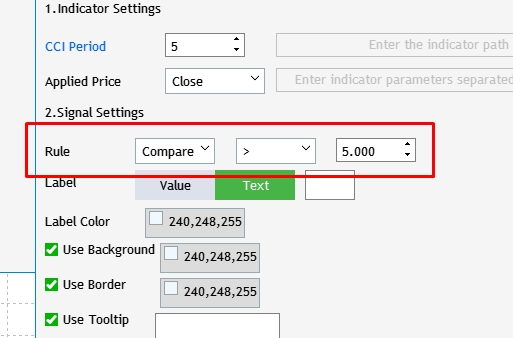
图例 4 为信号搜索规则添加模式选择。
为此,打开 OnEvent() 方法,然后在下拉列表中找到负责项目选择事件的部分,添加代码,从而根据所选模式显示正确的界面元素。
//--- Selecting an item in the combobox drop-down list
   if(id==CHARTEVENT_CUSTOM+ON_CLICK_COMBOBOX_ITEM)
   {
      ...
      //--- Rule type
      if(lparam==m_rule_interval.Id())
      {
         switch(m_rule_interval.GetListViewPointer().SelectedItemIndex())
         {
         case  0:
            m_rule_value[0].Hide();
            m_rule_type.Show();
            break;
         case  1:
            m_rule_value[0].Show();
            m_rule_type.Hide();
            break;
         default:
            break;
         }
      }
   }
接下来,我们将一些与界面加载有关的事件移到 OnEvent() 方法的单独部分。 为此,创建界面创建完成事件,然后从 CreateGUI() 方法将代码移至该事件。 以下代码应留在 CreateGUI 当中:
//+------------------------------------------------------------------+
//| Creates the graphical interface of the program                   |
//+------------------------------------------------------------------+
bool CProgram::CreateGUI(void)
{
//--- Loading the language
   ChangeLanguage();
//--- Step 1-3. Symbol selection window.
   if(!CreateStepWindow(m_lang[0]))
      return(false);
//---
   if(!CreateSetWindow(m_lang[17]))
      return(false);
//--- Creating form 2 for the color picker
   if(!CreateColorWindow("Color Picker"))
      return(false);
//--- Finishing the creation of GUI
   CWndEvents::CompletedGUI();
   return(true);
}
新部分如下所示:
// --- GUI creation completion
   if(id==CHARTEVENT_CUSTOM+ON_END_CREATE_GUI)
   {
      m_back_button.Hide();
      m_add_signal.Hide();
      m_signal_header.Hide();
      m_label_button[1].IsPressed(true);
      m_label_button[1].Update(true);
      for(int i=0; i<5; i++)
         m_signal_editor[i].Hide();
      m_rule_value[0].Hide();
   }
请注意应用程序加载时的新动作 — 隐藏新创建的输入下限间隔的字段。
创建新的 UI 元素和参数之后,我们可以继续修改加载算法,并保存交易信号设置集合。 转到 SaveSignalSet() 方法主体,并按最新修改进行调整。
//+------------------------------------------------------------------+
//|                                                                  |
//+------------------------------------------------------------------+
bool CProgram::SaveSignalSet(int index)
{
//---
   int h=FileOpen("Signal Monitor\\signal_"+string(index)+".bin",FILE_WRITE|FILE_BIN);
   if(h==INVALID_HANDLE)
   {
      if(TerminalInfoString(TERMINAL_LANGUAGE)=="Russian")
         MessageBox("Не удалось создать файл конфигурации","Монитор сигналов");
      else
         MessageBox("Failed to create configuration file","Signal Monitor");
      return(false);
   }
   if(index>4)
   {
      if(TerminalInfoString(TERMINAL_LANGUAGE)=="Russian")
         MessageBox("Максимальное число сигналов не должно быть больше 5","Монитор сигналов");
      else
         MessageBox("Maximum number of signals is 5","Signal Monitor");
      return(false);
   }
//--- Save the selection
//--- Indicator type
   m_signal_set[index].ind_type=m_indicator_type.GetListViewPointer().SelectedItemIndex();
//--- Indicator period
   if(m_signal_set[index].ind_type!=9)
   {
      m_signal_set[index].ind_period=(int)m_period_edit.GetValue();
      //--- Type of applied price
      m_signal_set[index].app_price=m_applied_price.GetListViewPointer().SelectedItemIndex();
   }
   else
   {
      string path=m_custom_path.GetValue();
      string param=m_custom_param.GetValue();
      if(path=="")
      {
         if(TerminalInfoString(TERMINAL_LANGUAGE)=="Russian")
            MessageBox("Введите путь к индикатору","Монитор сигналов");
         else
            MessageBox("Enter the indicator path","Signal Monitor");
         FileClose(h);
         return(false);
      }
      if(param=="")
      {
         if(TerminalInfoString(TERMINAL_LANGUAGE)=="Russian")
            MessageBox("Введите параметры индикатора через запятую","Монитор сигналов");
         else
            MessageBox("Enter indicator parameters separated by commas","Signal Monitor");
         FileClose(h);
         return(false);
      }
      StringToCharArray(path,m_signal_set[index].custom_path);
      StringToCharArray(param,m_signal_set[index].custom_val);
      m_signal_set[index].ind_period=(int)m_period_edit.GetValue();
   }
//--- Rule type
   m_signal_set[index].rule_int=m_rule_interval.GetListViewPointer().SelectedItemIndex();
//--- Comparison type
   m_signal_set[index].rule_type=m_rule_type.GetListViewPointer().SelectedItemIndex();
//--- Rule value
   m_signal_set[index].rule_value1=(double)m_rule_value[0].GetValue();
   m_signal_set[index].rule_value2=(double)m_rule_value[1].GetValue();
//--- Text label display type
   m_signal_set[index].label_type=m_label_button[0].IsPressed()?0:1;
//--- Save the value of the text field for the second type
   if(m_label_button[1].IsPressed())
      StringToCharArray(StringSubstr(m_text_box.GetValue(),0,3),m_signal_set[index].label_value);
//--- Color of the text label
   m_signal_set[index].label_color=m_color_button[0].CurrentColor();
//--- Background color
   if(m_set_param[0].IsPressed())
      m_signal_set[index].back_color=m_color_button[1].CurrentColor();
   else
      m_signal_set[index].back_color=clrNONE;
//--- Border color
   if(m_set_param[1].IsPressed())
      m_signal_set[index].border_color=m_color_button[2].CurrentColor();
   else
      m_signal_set[index].border_color=clrNONE;
//--- Tooltip value
   m_signal_set[index].tooltip=m_set_param[2].IsPressed();
   if(m_signal_set[index].tooltip)
      StringToCharArray(m_tooltip_text.GetValue(),m_signal_set[index].tooltip_text);
//--- Selected image
   m_signal_set[index].image=m_set_param[3].IsPressed();
   if(m_signal_set[index].image)
      m_signal_set[index].img_index=m_pictures_slider.GetRadioButtonsPointer().SelectedButtonIndex();
//--- Selected timegrames
   int tf=0;
   for(int i=0; i<21; i++)
   {
      if(!m_tf_button[i].IsLocked() && m_tf_button[i].IsPressed())
      {
         m_signal_set[index].timeframes[i]=true;
         StringToCharArray(m_tf_button[i].LabelText(),m_signal_set[index].tf_name[i].tf);
         tf++;
      }
      else
         m_signal_set[index].timeframes[i]=false;
   }
//---
   if(tf<1)
   {
      if(TerminalInfoString(TERMINAL_LANGUAGE)=="Russian")
         MessageBox("Не выбран ни один таймфрейм","Монитор сигналов");
      else
         MessageBox("No timeframes selected","Signal Monitor");
      FileClose(h);
      return(false);
   }
//---
   FileWriteStruct(h,m_signal_set[index]);
   FileClose(h);
   Print("Configuration signal_"+string(index)+" has been successfully saved");
//---
   return(true);
}
上面的代码包含很多修改。 我们来详细研究主要变化。 第一项是检查所选项是标准指标或是自定义指标。 选择自定义指标后,添加指标路径保存算法及其参数,并从输入字段中取周期值 - 对于自定义指标,此字段能够获取指标缓冲区的编号。
我们已更改了要保存的参数数量。 相应地,我们需要更改 SIGNAL 结构,通过该结构将所有内容保存到二进制文件之中。 向其添加新变量:
struct SIGNAL
{
   int               ind_type;
   int               ind_period;
   int               app_price;
   int               rule_int;
   int               rule_type;
   double            rule_value1;
   double            rule_value2;
   int               label_type;
   uchar             label_value[10];
   color             label_color;
   color             back_color;
   color             border_color;
   bool              tooltip;
   uchar             tooltip_text[100];
   bool              image;
   int               img_index;
   bool              timeframes[21];
   TFNAME            tf_name[21];
   uchar             custom_path[100];
   uchar             custom_val[100];
};
现在,比较(Comparison)的阈值输入字段已更改为 rule_value,并且在间隔(Interval)模式中将其上限和下限更改为 rule_value 1 和 rule_value 2。 添加了 custom_path 和 custom_val 变量,存储有关自定义指标路径及其参数的数据。 另外,修改文件里的加载/设置交易信号参数集合的方法: LoadSignalSet():
//+------------------------------------------------------------------+
//|                                                                  |
//+------------------------------------------------------------------+
bool CProgram::LoadSignalSet(int index)
{
   int h=FileOpen("Signal Monitor\\signal_"+string(index)+".bin",FILE_READ|FILE_BIN);
   if(h==INVALID_HANDLE)
   {
      MessageBox("Configuration not found","Signal Monitor");
      return(false);
   }
   ZeroMemory(m_signal_set[index]);
   FileReadStruct(h,m_signal_set[index]);
//--- Loading indicator type
   m_indicator_type.SelectItem(m_signal_set[index].ind_type);
   RebuildParameters(m_signal_set[index].ind_type);
   m_indicator_type.GetButtonPointer().Update(true);
   if(m_signal_set[index].ind_type!=9)
   {
      //--- Loading indicator period
      m_period_edit.SetValue((string)m_signal_set[index].ind_period);
      m_period_edit.GetTextBoxPointer().Update(true);
      //--- Loading applied price
      if(!m_applied_price.IsLocked())
      {
         m_applied_price.SelectItem(m_signal_set[index].app_price);
         m_applied_price.GetButtonPointer().Update(true);
      }
   }
   else
   {
      m_period_edit.SetValue((string)m_signal_set[index].ind_period);
      m_custom_path.SetValue(CharArrayToString(m_signal_set[index].custom_path));
      m_custom_param.SetValue(CharArrayToString(m_signal_set[index].custom_val));
      m_custom_path.GetTextBoxPointer().Update(true);
      m_custom_param.GetTextBoxPointer().Update(true);
   }
//--- Loading signal rule
   m_rule_interval.SelectItem(m_signal_set[index].rule_int);
   m_rule_interval.GetButtonPointer().Update(true);
   m_rule_type.SelectItem(m_signal_set[index].rule_type);
   m_rule_type.GetButtonPointer().Update(true);
   m_rule_value[0].SetValue((string)m_signal_set[index].rule_value1);
   m_rule_value[0].GetTextBoxPointer().Update(true);
   m_rule_value[1].SetValue((string)m_signal_set[index].rule_value2);
   m_rule_value[1].GetTextBoxPointer().Update(true);
//--- Loading a text label
   if(m_signal_set[index].label_type==0)
   {
      m_label_button[0].IsPressed(true);
      m_label_button[0].Update(true);
      m_label_button[1].IsPressed(false);
      m_label_button[1].Update(true);
      m_text_box.IsLocked(true);
   }
   else
   {
      m_label_button[0].IsPressed(false);
      m_label_button[0].Update(true);
      m_label_button[1].IsPressed(true);
      m_label_button[1].Update(true);
      m_text_box.IsLocked(false);
      m_text_box.ClearTextBox();
      m_text_box.AddText(0,CharArrayToString(m_signal_set[index].label_value));
      m_text_box.Update(true);
   }
//--- Loading the color of the text label
   m_color_button[0].CurrentColor(m_signal_set[index].label_color);
   m_color_button[0].Update(true);
//--- Loading the background color
   if(m_signal_set[index].back_color==clrNONE)
   {
      m_set_param[0].IsPressed(false);
      m_set_param[0].Update(true);
      m_color_button[1].IsLocked(true);
      m_color_button[1].GetButtonPointer().Update(true);
   }
   else
   {
      m_set_param[0].IsPressed(true);
      m_set_param[0].Update(true);
      m_color_button[1].IsLocked(false);
      m_color_button[1].CurrentColor(m_signal_set[index].back_color);
      m_color_button[1].GetButtonPointer().Update(true);
   }
//--- Loading the border color
   if(m_signal_set[index].border_color==clrNONE)
   {
      m_set_param[1].IsPressed(false);
      m_set_param[1].Update(true);
      m_color_button[2].IsLocked(true);
      m_color_button[2].GetButtonPointer().Update(true);
   }
   else
   {
      m_set_param[1].IsPressed(true);
      m_set_param[1].Update(true);
      m_color_button[2].IsLocked(false);
      m_color_button[2].CurrentColor(m_signal_set[index].border_color);
      m_color_button[2].GetButtonPointer().Update(true);
   }
//--- Loading the tooltip value
   if(!m_signal_set[index].tooltip)
   {
      m_set_param[2].IsPressed(false);
      m_set_param[2].Update(true);
      m_tooltip_text.IsLocked(true);
      m_tooltip_text.Update(true);
   }
   else
   {
      m_set_param[2].IsPressed(true);
      m_set_param[2].Update(true);
      m_tooltip_text.IsLocked(false);
      m_tooltip_text.ClearTextBox();
      m_tooltip_text.AddText(0,CharArrayToString(m_signal_set[index].tooltip_text));
      m_tooltip_text.Update(true);
   }
//--- Loading the image
   if(!m_signal_set[index].image)
   {
      m_set_param[3].IsPressed(false);
      m_set_param[3].Update(true);
      m_pictures_slider.IsLocked(true);
      m_pictures_slider.GetRadioButtonsPointer().Update(true);
   }
   else
   {
      m_set_param[3].IsPressed(true);
      m_set_param[3].Update(true);
      m_pictures_slider.IsLocked(false);
      m_pictures_slider.GetRadioButtonsPointer().SelectButton(m_signal_set[index].img_index);
      m_pictures_slider.GetRadioButtonsPointer().Update(true);
   }
//--- Loading selected timeframes
   for(int i=0; i<21; i++)
   {
      if(!m_tf_button[i].IsLocked())
      {
         m_tf_button[i].IsPressed(m_signal_set[index].timeframes[i]);
         m_tf_button[i].Update(true);
      }
   }
//---
   FileClose(h);
   return(true);
}
检查从文件中选择的是标准指标,或是自定义指标。 相应地,加载所需数据至设置窗口界面,以便进一步的编辑。
保存和加载一套交易信号参数的操作已就绪。 现在,优调信号搜索算法。 打开 GetSignal() 方法,然后找到检查条件部分。 替换如下:
//--- Check the condition
   int s=0;
   if(signal_set.rule_int==0)
   {
      double r_value=signal_set.rule_value2;
      double c_value=val[0];
      m_ind_value=c_value;
      switch(signal_set.rule_type)
      {
      case  0:
         if(c_value>r_value)
            s=1;
         break;
      case  1:
         if(c_value>=r_value)
            s=1;
         break;
      case  2:
         if(c_value==r_value)
            s=1;
         break;
      case  3:
         if(c_value<r_value)
            s=1;
         break;
      case  4:
         if(c_value<=r_value)
            s=1;
         break;
      default:
         s=0;
         break;
      }
   }
   else if(signal_set.rule_int==1)
   {
      double r_value_min=signal_set.rule_value1;
      double r_value_max=signal_set.rule_value2;
      double c_value=val[0];
      m_ind_value=c_value;
      if(c_value>=r_value_min && c_value<=r_value_max)
         s=1;
   }
还有,所添加指标要包含在获取所选指标句柄部分当中:
//--- Get the handle of the selected indicator
   string str[],name;
   double arr[];
   switch(signal_set.ind_type)
   {
   case  0:
      h=iATR(sy,tf,signal_set.ind_period);
      break;
   case  1:
      h=iCCI(sy,tf,signal_set.ind_period,app_price);
      break;
   case  2:
      h=iDeMarker(sy,tf,signal_set.ind_period);
      break;
   case  3:
      h=iForce(sy,tf,signal_set.ind_period,MODE_SMA,VOLUME_TICK);
      break;
   case  4:
      h=iWPR(sy,tf,signal_set.ind_period);
      break;
   case  5:
      h=iRSI(sy,tf,signal_set.ind_period,app_price);
      break;
   case  6:
      h=iMomentum(sy,tf,signal_set.ind_period,app_price);
      break;
   case  7:
      h=iADX(sy,tf,signal_set.ind_period);
      break;
   case  8:
      h=iADXWilder(sy,tf,signal_set.ind_period);
      break;
   case  9:
      StringSplit(m_custom_param.GetValue(),StringGetCharacter(",",0),str);
      ArrayResize(arr,ArraySize(str));
      for(int i=0; i<ArraySize(str); i++)
         arr[i]=StringToDouble(str[i]);
      name=m_custom_path.GetValue();
      h=GetCustomValue(tf,name,arr);
      break;
   default:
      break;
   }
现在,该模块包括了检查搜索模式,即 Comparison 或 Interval 。 应用相应地条件检查。
如果交易账户上没有太多交易品种,则在选择它们时,用名称加旁边的复选框实现就足够了。 但当操控数百个品种时,应用程序窗口的高度就会暴增(因为它会依据品种的行数进行缩放)。 这就是为什么该视图要被替换为表格形式的原因。 进而,如果品种过多,它们当中的一些品种会被隐藏,而在右侧会多出滚动条。 不过,我们仍然需要复选框来选择工作时间帧。 因此,我们需要解决若干个问题:
首先,我们删除旧的复选框显示。 为此,请将其隐藏在 GUI 创建完成事件中。 现在我们可以知道复选框的数量是恒定的:21;如果可能的话,它等于终端中的时间帧总数。 所以,将动态 m_checkbox[] 数组转换为大小为 21 的静态数组。
      //--- Hide timeframe checkboxes
      for(int i=0; i<21; i++)
         m_checkbox[i].Hide();
此外,由于它们的用途明确,故需调整复选框的创建方法。 转到 CreateStepWindow() 方法主体,并按如下所示替换 Checkboxes 部分:
//--- Checkboxes
   int k=0;
   string timeframe_names[21]=
   {
      "M1","M2","M3","M4","M5","M6","M10","M12","M15","M20","M30",
      "H1","H2","H3","H4","H6","H8","H12","D1","W1","MN"
   };
   for(int j=0; j<=3; j++)
   {
      for(int i=0; i<7; i++)
      {
         if(k<21)
            if(!CreateCheckBox(m_checkbox[k],10+80*i,m_step_window.CaptionHeight()+70+j*25,timeframe_names[k]))
               return(false);
         k++;
      }
   }
还要删除窗口高度计算窗口(需要根据市场观察中的交易品种数量来计算高度)。
m_step_window.ChangeWindowHeight(m_checkbox[m_all_symbols-1].YGap()+30+30);
令窗口高度为静态:
m_step_window.YSize(500); 现在,我们需要创建表格的基本对象,然后在该表格里填充来自市场观察的数据。 创建 CTable 类实例和表格的实现方法。
//--- Rendered table
   CTable            m_table;

   bool              CreateTable(const int x_gap,const int y_gap);
在主窗口文件 StepWindow.mqh 中实现它:
//+------------------------------------------------------------------+
//|                                                                  |
//+------------------------------------------------------------------+
bool CProgram::CreateTable(const int x_gap,const int y_gap)
{
#define COLUMNS1_TOTAL 7
#define ROWS1_TOTAL int(MathCeil(m_all_symbols/7))
//--- Save the pointer to the main control
   m_table.MainPointer(m_step_window);
//--- Array of column widths
   int width[COLUMNS1_TOTAL];
   ::ArrayInitialize(width,80);
//--- Array of text offset along the X axis in the columns
   int text_x_offset[COLUMNS1_TOTAL];
   ::ArrayInitialize(text_x_offset,25);
//--- Array of text alignment in columns
   ENUM_ALIGN_MODE align[COLUMNS1_TOTAL];
   ::ArrayInitialize(align,ALIGN_LEFT);
//--- Array of column image offsets along the X axis
   int image_x_offset[COLUMNS1_TOTAL];
   ::ArrayInitialize(image_x_offset,5);
//--- Array of column image offsets along the Y axis
   int image_y_offset[COLUMNS1_TOTAL];
   ::ArrayInitialize(image_y_offset,4);
//--- Properties
   m_table.XSize(560);
   m_table.YSize(190);
   m_table.Font(m_base_font);
   m_table.FontSize(m_base_font_size);
   m_table.CellYSize(20);
   m_table.TableSize(COLUMNS1_TOTAL,ROWS1_TOTAL);
   m_table.TextAlign(align);
   m_table.ColumnsWidth(width);
   m_table.TextXOffset(text_x_offset);
   m_table.ImageXOffset(image_x_offset);
   m_table.ImageYOffset(image_y_offset);
   m_table.LabelXGap(5);
   m_table.LabelYGap(4);
   m_table.IconXGap(7);
   m_table.IconYGap(4);
   m_table.MinColumnWidth(0);
   m_table.LightsHover(true);
   m_table.SelectableRow(false);
   m_table.IsWithoutDeselect(false);
   m_table.ColumnResizeMode(true);
   m_table.IsZebraFormatRows(clrWhiteSmoke);
   m_table.AutoXResizeMode(true);
   m_table.AutoXResizeRightOffset(10);
   m_table.AutoYResizeMode(true);
   m_table.AutoYResizeBottomOffset(50);
//--- Populate the table with data
   InitializingTable();
//--- Create the control
   if(!m_table.CreateTable(x_gap,y_gap))
      return(false);
//--- Add the object to the common array of the object groups
   CWndContainer::AddToElementsArray(0,m_table);
   return(true);
}
用此方法创建表格之前,先用以下数据填充该表格:来自当前交易帐户市场观察里的所有品种列表。 这是由 InitializingTable() 方法完成的:将其添加到基类的私密部分:
//+------------------------------------------------------------------+
//| Initialize the table                                             |
//+------------------------------------------------------------------+
void CProgram::InitializingTable(void)
{
//--- Array of icons 1
   string image_array1[2]=
   {
      "Images\\EasyAndFastGUI\\Controls\\checkbox_off.bmp",
      "Images\\EasyAndFastGUI\\Controls\\checkbox_on_g.bmp"
   };
//---
   int k=0;
   for(int c=0; c<COLUMNS1_TOTAL; c++)
   {
      //---
      for(int r=0; r<ROWS1_TOTAL; r++)
      {
         if(k<m_all_symbols)
         {
            //--- Set the cell type to Checkbox
            m_table.CellType(c,r,CELL_CHECKBOX);
            m_table.SetImages(c,r,image_array1);
            //--- Set the text
            m_table.SetValue(c,r,SymbolName(k,false));
         }
         k++;
      }
   }
}
现在,在 CreateStepWindow() 方法主体中,依据以上准备工作来创建并填充表格。 结果就是,我们从市场观察(图例 5)中获取所有品种的列表,该列表也是基于复选框选择类型,但现在以表格形式显示。

图例 5 将品种列表转换为表格形式的结果。
下一步是将新创建的表格与之前的一组复选框之间的交互链接。 如此提供了以下可能性:
为了实现第一种可能性,请用以下代码替换 OnEvent() 中的模板名称:
//--- All
         if(lparam==m_currency_set[0].Id() && m_currency_set[0].IsPressed())
         {
            m_currency_set[1].IsPressed(false);
            m_currency_set[2].IsPressed(false);
            m_currency_set[1].Update(true);
            m_currency_set[2].Update(true);
            //---
            int k=0;
            for(int c=0; c<7; c++)
            {
               //---
               for(int r=0; r<MathCeil(m_all_symbols/7); r++)
               {
                  if(k<m_all_symbols)
                     m_table.ChangeImage(c,r,1);
                  k++;
               }
            }
            m_table.Update(true);
         }
         //--- Majors
         else if(lparam==m_currency_set[1].Id() && m_currency_set[1].IsPressed())
         {
            m_currency_set[0].IsPressed(false);
            m_currency_set[2].IsPressed(false);
            m_currency_set[0].Update(true);
            m_currency_set[2].Update(true);
            //---
            string pairs[4]= {"EURUSD","GBPUSD","USDCHF","USDJPY"};
            //--- Clear the selection
            int k=0;
            for(int c=0; c<7; c++)
            {
               //---
               for(int r=0; r<MathCeil(m_all_symbols/7); r++)
               {
                  if(k<m_all_symbols)
                     m_table.ChangeImage(c,r,0);
                  k++;
               }
            }
            //---
            k=0;
            for(int c=0; c<7; c++)
            {
               //---
               for(int r=0; r<MathCeil(m_all_symbols/7); r++)
               {
                  if(k<m_all_symbols)
                  {
                     for(int j=0; j<4; j++)
                     {
                        if(m_table.GetValue(c,r)==pairs[j])
                           m_table.ChangeImage(c,r,1);
                     }
                  }
                  k++;
               }
            }
            m_table.Update(true);
         }
         //--- Crosses
         else if(lparam==m_currency_set[2].Id() && m_currency_set[2].IsPressed())
         {
            m_currency_set[0].IsPressed(false);
            m_currency_set[1].IsPressed(false);
            m_currency_set[0].Update(true);
            m_currency_set[1].Update(true);
            //---
            string pairs[20]=
            {
               "EURUSD","GBPUSD","USDCHF","USDJPY","USDCAD","AUDUSD","AUDNZD","AUDCAD","AUDCHF","AUDJPY",
               "CHFJPY","EURGBP","EURAUD","EURCHF","EURJPY","EURCAD","EURNZD","GBPCHF","GBPJPY","CADCHF"
            };
            //--- Clear the selection
            int k=0;
            for(int c=0; c<7; c++)
            {
               //---
               for(int r=0; r<MathCeil(m_all_symbols/7); r++)
               {
                  if(k<m_all_symbols)
                     m_table.ChangeImage(c,r,0);
                  k++;
               }
            }
            //---
            k=0;
            for(int c=0; c<7; c++)
            {
               //---
               for(int r=0; r<MathCeil(m_all_symbols/7); r++)
               {
                  if(k<m_all_symbols)
                  {
                     for(int j=0; j<20; j++)
                     {
                        if(m_table.GetValue(c,r)==pairs[j])
                           m_table.ChangeImage(c,r,1);
                     }
                  }
                  k++;
               }
            }
            m_table.Update(true);
         }
         //---
         if((lparam==m_currency_set[0].Id() && !m_currency_set[0].IsPressed())      ||
               (lparam==m_currency_set[1].Id() && !m_currency_set[1].IsPressed())   ||
               (lparam==m_currency_set[2].Id() && !m_currency_set[2].IsPressed())
           )
         {
            //--- Clear the selection
            int k=0;
            for(int c=0; c<7; c++)
            {
               //---
               for(int r=0; r<MathCeil(m_all_symbols/7); r++)
               {
                  if(k<m_all_symbols)
                     m_table.ChangeImage(c,r,0);
                  k++;
               }
            }
            m_table.Update(true);
         }
以前执行的保存和加载所选品种集合的方法,现在我们分别用 SaveSymbolSet() 和 LoadSymbolSet() 方法来保存和加载所选品种集合。 在此,我们需要修改从复选框中获取数据的代码部分,因为数据现在要从新创建的表格里获取。 相应地,数据应加载到同一表格中。
//+------------------------------------------------------------------+
//| Save template to a file                                          |
//+------------------------------------------------------------------+
bool CProgram::SaveSymbolSet(string file_name)
{
   if(file_name=="")
   {
      if(TerminalInfoString(TERMINAL_LANGUAGE)=="Russian")
         MessageBox("Выберите имя шаблона для записи","Монитор сигналов");
      else
         MessageBox("Choose a name for the template to save","Signal Monitor");
      return(false);
   }
   int h=FileOpen("Signal Monitor\\"+file_name+".bin",FILE_WRITE|FILE_BIN);
   if(h==INVALID_HANDLE)
   {
      if(TerminalInfoString(TERMINAL_LANGUAGE)=="Russian")
         MessageBox("Не удалось создать файл конфигурации","Монитор сигналов");
      else
         MessageBox("Failed to create configuration file","Signal Mo
nitor");
      return(false);
   }
   else
      MessageBox("The "+file_name+" configuration has been successfully saved","Signal Monitor");
//--- Save symbol selection
   int k=0;
   for(int c=0; c<7; c++)
   {
      //---
      for(int r=0; r<MathCeil(m_all_symbols/7); r++)
      {
         if(k<m_all_symbols)
            m_save.tf[k]=m_table.SelectedImageIndex(c,r)>0?true:false;
         k++;
      }
   }
//---
   FileWriteStruct(h,m_save);
   FileClose(h);
//---
   return(true);
}
//+------------------------------------------------------------------+
//| Load data to a panel                                             |
//+------------------------------------------------------------------+
bool CProgram::LoadSymbolSet(string file_name)
{
   if(file_name=="")
   {
      if(TerminalInfoString(TERMINAL_LANGUAGE)=="Russian")
         MessageBox("Выберите имя шаблона для загрузки","Монитор сигналов");
      else
         MessageBox("Choose a name for the template to load","Signal Monitor");
      return(false);
   }
   int h=FileOpen("Signal Monitor\\"+file_name+".bin",FILE_READ|FILE_BIN);
   if(h==INVALID_HANDLE)
   {
      MessageBox("Configuration "+file_name+" not found","Signal Monitor");
      return(false);
   }
   ZeroMemory(m_save);
   FileReadStruct(h,m_save);
//--- Load symbol selection
   int k=0;
   for(int c=0; c<7; c++)
   {
      //---
      for(int r=0; r<MathCeil(m_all_symbols/7); r++)
      {
         if(k<m_all_symbols)
         {
            if(m_save.tf[k])
               m_table.ChangeImage(c,r,1);
            else
               m_table.ChangeImage(c,r,0);
         }
         k++;
      }
   }
   m_table.Update(true);
//---
   FileClose(h);
//---
   return(true);
}
现在,我们标记数据收集,并用结构记忆,之后保存到文件中的代码块。 另外,在此从文件加载数据并保存到结构中,并从结构里提取数据添加到表格中。
所有修改和增加的视觉结果如图例 6 所示,但主要目的是便捷地操控大量品种,而这原本并不适合窗口。
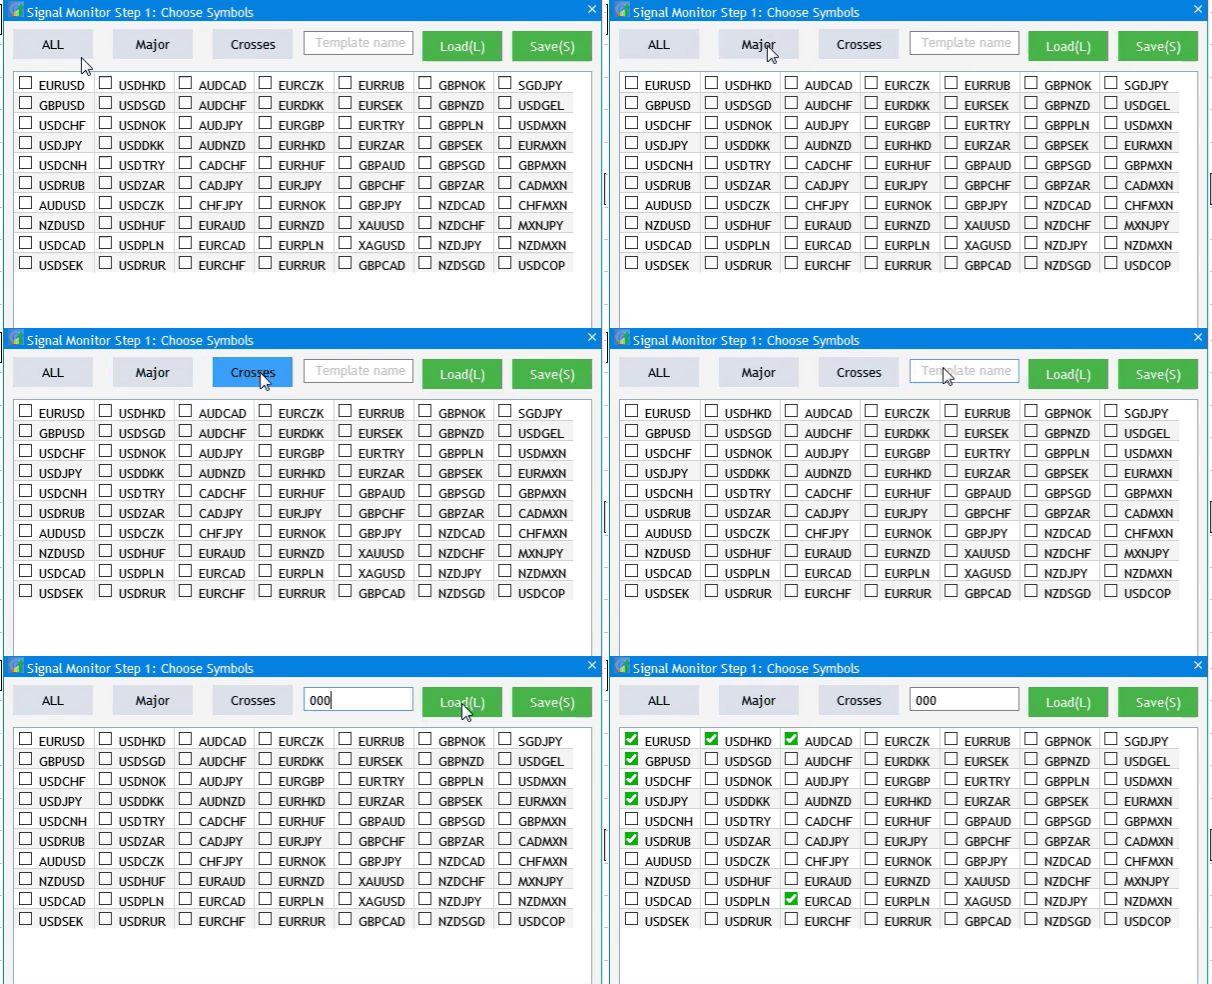
图例 6 表格填充及其与 UI 元素交互的结果。
将来,因为我们已修改了获取有关选定品种信息的方式,故我们需要编辑步骤 1 和步骤 2 之间的转换方法。 配置步骤之间的转换通过两种方法执行,这些亦需修改。 To_Step1() 应该进行如下修改:当我们从步骤 2 跳到步骤 1 时,应隐藏选择时间帧的可能性,并显示表格。
//+------------------------------------------------------------------+
//| Go to Step 1                                                     |
//+------------------------------------------------------------------+
void CProgram::ToStep_1(void)
{
//--- Change header
   m_step_window.LabelText("Signal Monitor Step 1: Choose Symbols");
   m_step_window.Update(true);
//--- Hide the Back button
   m_back_button.Hide();
//--- Show the table
   m_table.Show();
//--- Hide timeframes
   for(int i=0; i<21; i++)
      m_checkbox[i].Hide();
   string names[3]= {"All","Majors","Crosses"};
//--- Change names of selection buttons
   for(int i=0; i<3; i++)
   {
      m_currency_set[i].IsPressed(false);
      m_currency_set[i].LabelText(names[i]);
      m_currency_set[i].Update(true);
   }
//--- Show block for working with templates
   m_text_edit.Show();
   m_load_button.Show();
   m_save_button.Show();
//--- Set the current setup step
   m_current_step=1;
}
在 To_Step2() 方法中,隐藏表格,显示时间帧选择,并记住在第一步中所选品种。
//+------------------------------------------------------------------+
//|                                                                  |
//+------------------------------------------------------------------+
void CProgram::ToStep_2(void)
{
//--- Check whether at least one symbol is selected
   int cnt=0;
//---
   for(int c=0; c<7; c++)
   {
      for(int r=0; r<MathCeil(m_all_symbols/7); r++)
      {
         if(m_table.SelectedImageIndex(c,r)>0)
            cnt++;
      }
   }
//---
   if(cnt<1)
   {
      if(TerminalInfoString(TERMINAL_LANGUAGE)=="Russian")
         MessageBox("Не выбран ни один символ!","Внимание");
      else
         MessageBox("No symbols selected!","Warning");
      return;
   }
//--- Hide the table
   m_table.Hide();
//--- Display timeframes
   for(int i=0; i<21; i++)
      m_checkbox[i].Show();
//--- Count the number of selected symbols
   ArrayResize(m_symbols,cnt);
   cnt=0;
//--- Remember the selected symbols in the array
   for(int c=0; c<7; c++)
   {
      for(int r=0; r<MathCeil(m_all_symbols/7); r++)
      {
         if(m_table.SelectedImageIndex(c,r)>0)
         {
            m_symbols[cnt]=m_table.GetValue(c,r);
            cnt++;
         }
      }
   }
//--- Set selected symbols in Market Watch
   for(int c=0; c<7; c++)
   {
      for(int r=0; r<MathCeil(m_all_symbols/7); r++)
      {
         if(m_table.SelectedImageIndex(c,r)>0)
            SymbolSelect(m_table.GetValue(c,r),true);
         else
            SymbolSelect(m_table.GetValue(c,r),false);
      }
   }
//---
   if(m_current_step==3)
   {
      m_add_signal.Hide();
      m_signal_header.Hide();
      m_next_button.LabelText("Next");
      m_next_button.Update(true);
      for(int i=0; i<5; i++)
         m_signal_editor[i].Hide();
      ClearSaves();
   }
//--- Change header
   m_step_window.LabelText("Signal Monitor Step 2: Choose Timeframes");
   m_step_window.Update(true);
   string names[3]= {"All","Junior","Senior"};
//--- Change names of selection buttons
   for(int i=0; i<3; i++)
   {
      m_currency_set[i].LabelText(names[i]);
      m_currency_set[i].IsPressed(false);
      if(m_current_step==3)
         m_currency_set[i].Show();
      m_currency_set[i].Update(true);
   }
//--- Hide block for working with templates
   m_text_edit.Hide();
   m_load_button.Hide();
   m_save_button.Hide();
//--- Show Back button
   m_back_button.Show();
//---
   m_current_step=2;
}
现在,我们需要调整预设时间帧集合的选择按钮与复选框列表之间的交互。 由于列表现在是恒定的,因此应在代码中进行相应的修改:
//--- All
         if(lparam==m_currency_set[0].Id() && m_currency_set[0].IsPressed())
         {
            m_currency_set[1].IsPressed(false);
            m_currency_set[2].IsPressed(false);
            m_currency_set[1].Update(true);
            m_currency_set[2].Update(true);
            //---
            for(int i=0; i<21; i++)
            {
               m_checkbox[i].IsPressed(true);
               m_checkbox[i].Update(true);
            }
         }
         //--- Junior Timeframes
         else if(lparam==m_currency_set[1].Id() && m_currency_set[1].IsPressed())
         {
            m_currency_set[0].IsPressed(false);
            m_currency_set[2].IsPressed(false);
            m_currency_set[0].Update(true);
            m_currency_set[2].Update(true);
            //---
            string pairs[11]=
            {
               "M1","M2","M3","M4","M5","M6","M10","M12","M15","M20","M30"
            };
            //--- Clear the selection
            for(int i=0; i<21; i++)
            {
               m_checkbox[i].IsPressed(false);
               m_checkbox[i].Update(true);
            }
            //---
            for(int i=0; i<21; i++)
            {
               for(int j=0; j<11; j++)
                  if(m_checkbox[i].LabelText()==pairs[j])
                  {
                     m_checkbox[i].IsPressed(true);
                     m_checkbox[i].Update(true);
                  }
            }
         }
         //--- Senior Timeframes
         else if(lparam==m_currency_set[2].Id() && m_currency_set[2].IsPressed())
         {
            m_currency_set[0].IsPressed(false);
            m_currency_set[1].IsPressed(false);
            m_currency_set[0].Update(true);
            m_currency_set[1].Update(true);
            //---
            string pairs[10]=
            {
               "H1","H2","H3","H4","H6","H8","H12","D1","W1","MN"
            };
            //--- Clear the selection
            for(int i=0; i<21; i++)
            {
               m_checkbox[i].IsPressed(false);
               m_checkbox[i].Update(true);
            }
            //---
            for(int i=0; i<21; i++)
            {
               for(int j=0; j<10; j++)
                  if(m_checkbox[i].LabelText()==pairs[j])
                  {
                     m_checkbox[i].IsPressed(true);
                     m_checkbox[i].Update(true);
                  }
            }
         }
         //---
         if((lparam==m_currency_set[0].Id() && !m_currency_set[0].IsPressed())      ||
               (lparam==m_currency_set[1].Id() && !m_currency_set[1].IsPressed())   ||
               (lparam==m_currency_set[2].Id() && !m_currency_set[2].IsPressed())
           )
         {
            //--- Clear the selection
            for(int i=0; i<21; i++)
            {
               m_checkbox[i].IsPressed(false);
               m_checkbox[i].Update(true);
            }
         }
在信号监控期间,用户可能需要更改以前创建的筛选交易信号的条件。 当前,这可以通过重新启动应用程序,并在监视器里为加入的每个所需信号重新配置参数来完成。 这个方案很不方便。 因此,我们提供从监视器本身针对准备好的交易信号进行编辑的可能性。 我们在监视器界面里添加一个按钮,以便打开一个小对话框,如图例 7 所示。 该对话框将包含所有已创建交易信号的列表。 单击信号可打开它进行编辑。

图例 7 编辑来自监视器的较早创建的信号。
我们继续实现。 若要显示打开交易信号列表窗口的按钮,请在 CreateStepWindow() 方法主体中添加以下属性:
m_step_window.TooltipsButtonIsUsed(true); 然后在 GUI 创建完成事件中将其禁用 - 因此,该按钮不会在应用程序初始设置步骤中显示,仅在创建所有信号并启动监视器之后才会显示:
// --- GUI creation completion
   if(id==CHARTEVENT_CUSTOM+ON_END_CREATE_GUI)
   {
      ...
      m_step_window.GetTooltipButtonPointer().Hide();
   }
加载监视器时启用它。
//+------------------------------------------------------------------+
//|                                                                  |
//+------------------------------------------------------------------+
void CProgram::AutoResize(const int x_size,const int y_size)
{
   ...
   m_step_window.GetTooltipButtonPointer().Show();
}
现在,创建一个新对话框,在其内显示已创建信号的列表。 创建一个 CWindow 类实例变量,并实现创建窗口的 CreateFastEdit() 方法,以及用于创建按钮的 CreateFastEditor() 方法。 (单击这些按钮将执行信号编辑)。
   CWindow           m_fast_edit;

   bool              CreateFastEdit(const string caption_text);
   bool              CreateFastEditor(CButton &button,string text,const int x_gap,const int y_gap);
这些方法的实现:
//+------------------------------------------------------------------+
//| Creates a window for creating and editing trading signals        |
//+------------------------------------------------------------------+
bool CProgram::CreateFastEdit(const string caption_text)
{
//--- Add the window pointer to the window array
   CWndContainer::AddWindow(m_fast_edit);
//--- Properties
   m_fast_edit.XSize(180);
   m_fast_edit.YSize(280);
//--- Coordinates
   int x=m_step_window.XGap()+m_step_window.XSize()+10;
   int y=m_step_window.YGap();
//---
   m_fast_edit.CaptionHeight(22);
   m_fast_edit.IsMovable(true);
   m_fast_edit.CaptionColor(m_caption);
   m_fast_edit.CaptionColorLocked(m_caption);
   m_fast_edit.CaptionColorHover(m_caption);
   m_fast_edit.BackColor(m_background);
   m_fast_edit.FontSize(m_base_font_size);
   m_fast_edit.Font(m_base_font);
   m_fast_edit.WindowType(W_DIALOG);
//--- Creating the form
   if(!m_fast_edit.CreateWindow(m_chart_id,m_subwin,caption_text,x,y))
      return(false);
//---
   for(int i=0; i<5; i++)
   {
      if(!CreateFastEditor(m_fast_editor[i],"Signal_"+string(i),10,40*i+40))
         return(false);
   }
   return(true);
}
//+------------------------------------------------------------------+
//| Creates a button with an image                                   |
//+------------------------------------------------------------------+
#resource "\\Images\\EasyAndFastGUI\\Icons\\bmp16\\settings_light.bmp"
bool CProgram::CreateFastEditor(CButton &button,string text,const int x_gap,const int y_gap)
{
//---
   color baseclr=C'70,180,70';
   color pressed=C'70,170,70';
//--- Save the window pointer
   button.MainPointer(m_fast_edit);
//--- Set up properties before creation
   button.XSize(110);
   button.YSize(30);
   button.Font(m_base_font);
   button.FontSize(m_base_font_size);
   button.IconXGap(3);
   button.IconYGap(7);
   button.IconFile("Images\\EasyAndFastGUI\\Icons\\bmp16\\settings_light.bmp");
   button.BackColor(baseclr);
   button.BackColorHover(baseclr);
   button.BackColorPressed(pressed);
   button.BorderColor(baseclr);
   button.BorderColorHover(baseclr);
   button.BorderColorPressed(pressed);
   button.LabelColor(clrWhite);
   button.LabelColorPressed(clrWhite);
   button.LabelColorHover(clrWhite);
   button.IsCenterText(true);
//--- Create the control
   if(!button.CreateButton(text,x_gap,y_gap))
      return(false);
//--- Add the element pointer to the base
   CWndContainer::AddToElementsArray(3,button);
   return(true);
}
在 CreateGUI() 方法主体中调用 CreateFastEdit() 方法。
//+------------------------------------------------------------------+
//| Creates the graphical interface of the program                   |
//+------------------------------------------------------------------+
bool CProgram::CreateGUI(void)
{
//--- Step 1-3. Symbol selection window.
   if(!CreateStepWindow("Signal Monitor Step 1: Choose Symbols"))
      return(false);
//---
   if(!CreateSetWindow("Signal Monitor Edit Signal"))
      return(false);
//--- Creating form 2 for the color picker
   if(!CreateColorWindow("Color Picker"))
      return(false);
//--- Creating a quick edit form
   if(!CreateFastEdit("Fast Signal Editor"))
      return(false);
//--- Finishing the creation of GUI
   CWndEvents::CompletedGUI();
   return(true);
}
现在,单击监视器中的 Settings 按钮就会打开包含信号的对话框。 为此,在 OnEvent() 方法的按钮单击事件部分中添加以下代码:
      //--- OPEN THE SETTING WINDOW
      if(lparam==m_step_window.GetTooltipButtonPointer().Id())
      {
         //--- Coordinates
         int x=m_step_window.X()+m_step_window.XSize()+10;
         int y=m_step_window.Y();
         m_fast_edit.X(x);
         m_fast_edit.Y(y);
         m_fast_edit.OpenWindow();
      }
如果您现在编译项目,将获得以下结果:

图例 8 添加一个快速编辑交易信号的窗口。
现在,该对话框含有所有信号编辑按钮,但其想法是仅显示已创建信号。 因此,我们增加当前可用信号数量的检查。 这可以通过打开对话框事件来完成:
//--- Opening a dialog window
   if(id==CHARTEVENT_CUSTOM+ON_OPEN_DIALOG_BOX)
   {
      if(m_current_step<4)
         return;
      for(int i=0; i<5; i++)
      {
         if(!FileIsExist("Signal Monitor\\signal_"+string(i)+".bin"))
            m_fast_editor[i].Hide();
      }
   }
在此执行检查:含有交易信号的文件是否存在。 如此,仅显示以前创建的信号。 现在,单击带含有已创建信号的按钮,将打开该信号的编辑窗口。 这是在按钮单击事件部分中完成的。
      //--- Trading signal editing
      for(int i=0; i<5; i++)
      {
         if(lparam==m_fast_editor[i].Id())
         {
            m_fast_edit.CloseDialogBox();
            LoadSignalSet(i);
            m_new_signal.LabelText("Save");
            m_new_signal.Update(true);
            RebuildParameters(m_indicator_type.GetListViewPointer().SelectedItemIndex());
            m_set_window.OpenWindow();
            m_number_signal=i;
         }
      }
在快速编辑窗口中单击信号之一,就会打开“设置”窗口,并加载该交易信号之前保存的数据。 以后,一旦所需数据有所变化,就应将新设置写入文件。 在这种情况下,我们不需要完成整个监视器设置过程。
为了解决本地化任务,需确定所有要翻译的 GUI 元素,而其中的一些元素可以保留不变,因为它们的名称已被广泛接受。 我们将利用一种简单的机制:我们将创建一个包含数据的字符串数组,该数据将根据所选语言在 UI 元素中进行替换。 我们将用两种语言:俄语和英语。 首先,我们在 SignalMonitor.mq5 文件中创建一个枚举,这可令我们能够在启动时选择所需的 UI 语言。 其中一些元素的名称将根据英文标准设置。
//+------------------------------------------------------------------+
//|                                                                  |
//+------------------------------------------------------------------+
enum UPDATE
{
   MINUTE,        // 1 minute
   MINUTE_15,     // 15 minutes
   MINUTE_30,     // 30 minutes
   HOUR,          // 1 hour
   HOUR_4         // 4 hour
};
enum LANG
{
   RUSSIAN,       // Russian
   ENGLISH        // English
};
//+------------------------------------------------------------------+
//| Expert Advisor input parameters                                  |
//+------------------------------------------------------------------+
input int                  Inp_BaseFont      =  10;                  // Base Font
input color                Caption           =  C'0,130,225';        // Caption Color
input color                Background        =  clrWhiteSmoke;       // Back color
input LANG                 Language          =  ENGLISH;             // Interface language
input UPDATE               Update            =  MINUTE;              // Update interval
若要将有关所选语言的信息传递给界面,请在 CProgram 基类的公开部分中创建一个变量。
   //---
   int               m_language;
所选语言的索引将在应用程序初始化期间分配给变量。
program.m_language=Language;
然后,在基类的私密部分中创建一个数组,该数组将根据所选语言在界面中接收要替换的数据。 还要创建一个将数据加载到界面的方法。
   string            m_lang[];

   void              ChangeLanguage(void);
现在,在 Program.mqh 文件中实现所声明的方法,并为每个 GUI 元素的相应字段设置语言值。
//+------------------------------------------------------------------+
//| Changing the interface language                                  |
//+------------------------------------------------------------------+
void CProgram::ChangeLanguage(void)
{
//---
#define ITEMS 40
   ArrayResize(m_lang,ITEMS);
   string rus[ITEMS]=
   {
      "Монитор Сигналов Шаг 1: Выбор Символов","Все","Мажоры","Кроссы",
      "Назад","Далее","Загрузка(L)","Сохранить(S)","Имя шаблона","Монитор сигналов Шаг 2: Выбор таймфреймов",
      "Все","Младшие","Старшие",
      "Монитор Сигналов Шаг 3: Создание торговых сигналов","Создать","Добавить сигнал","Список сигналов",
      "Редактор торговых сигналов","Тип индикатора","1.Настройки индикатора","Примен. цена",
      "Введите путь индикатора","Введите параметры индикатора через запятую",
      "2.Настройка сигнала","Правило","Метка","Значение","Текст","Цвет метки","Фон","Кант","Подсказка",
      "Изображение","Таймфреймы","Добавить","Отмена","Монитор торговых сигналов","Номер буфера","Сохранить"
   };
   string eng[ITEMS]=
   {
      "Signal Monitor Step 1: Choose Symbols","ALL","Major","Crosses",
      "Back","Next","Load(L)","Save(S)","Template name","Signal Monitor Step 2: Choose Timeframes",
      "ALL","Junior","Senior",
      "Signal Monitor Step 3: Creating Trading Signals","Create","Add Signal","Signal List",
      "Signal Monitor Edit Signal","Indicator Type","1.Indicator Settings","Applied Price",
      "Enter the indicator path","Enter indicator parameters separated by commas",
      "2.Signal Settings","Rule","Label","Value","Text","Label Color","Use Background","Use Border","Use Tooltip",
      "Use Image","Timeframes","Add","Cancel","Signal Monitor","Buffer number","Save"
   };
//--- Russian
   if(m_language==0)
      ArrayCopy(m_lang,rus);
//--- English
   else
      ArrayCopy(m_lang,eng);
}
因此,我们另外实现了俄语(图例 9)。 与此类似,您可以添加自己的首选语言
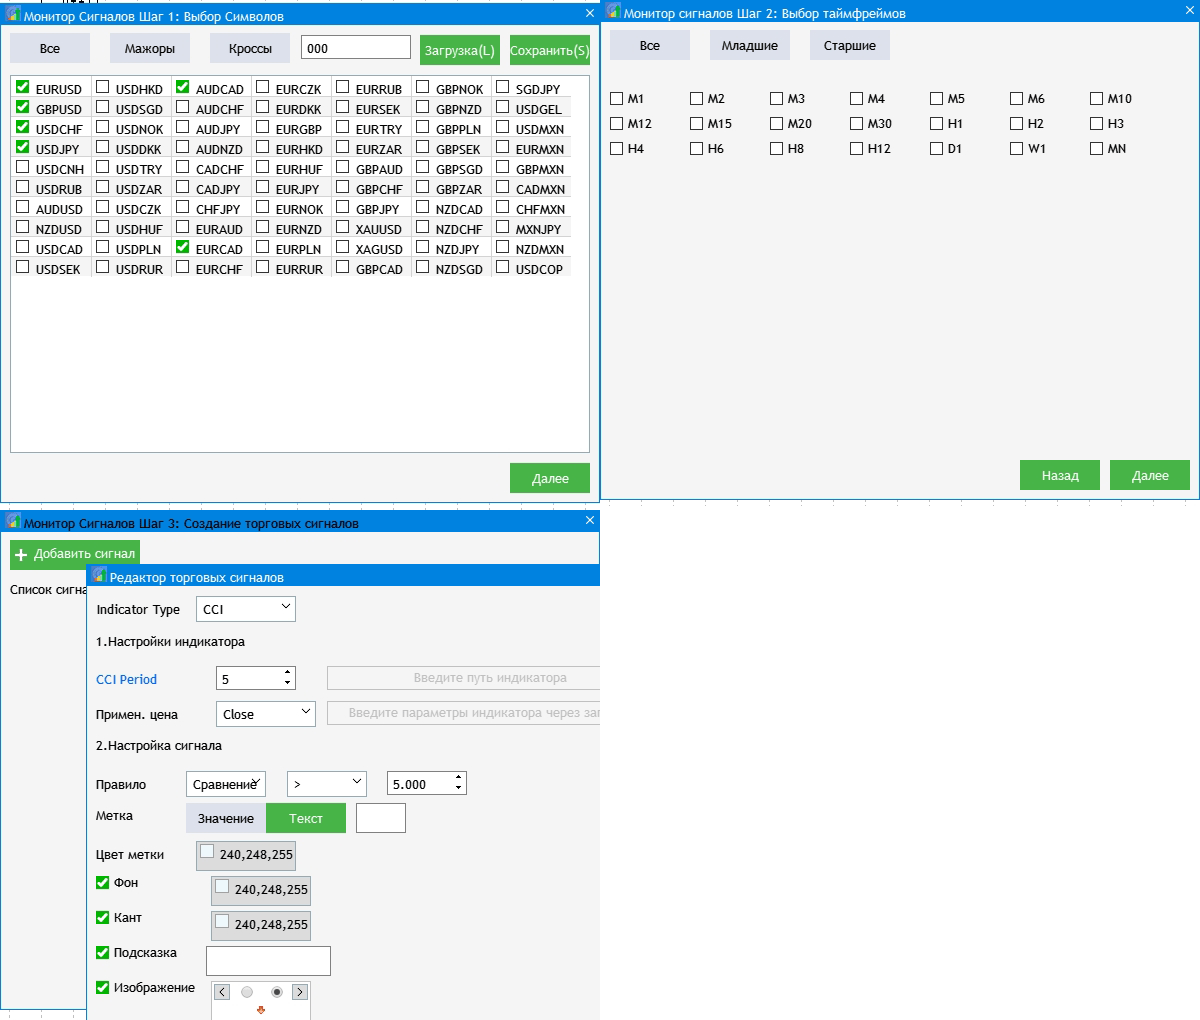
图例 9 GUI 本地化结果。
一些附加功能可改善监视器的视觉效果,并能够令您快速切换到所发现信号的品种图表。 可视部分是信号区域的扩展,因为当前所用的窗体看起来很小。 找到 CreateSignalButton() 方法,增加信号区域的大小,调整这些区域内元素的位置,并在 To_Monitor() 方法中重新排列彼此间的每个相对区域。
   button.XSize(60);
   button.YSize(30);
   button.IconXGap(2);
   button.IconYGap(11);
   button.LabelXGap(19);
   button.LabelYGap(10);
//--- Symbols
   int sy=ArraySize(m_symbols);
   ArrayResize(m_symbol_label,sy);
   for(int i=0; i<sy; i++)
   {
      if(!CreateSymbolLabel(m_symbol_label[i],5,m_step_window.CaptionHeight()+40+i*35,m_symbols[i]))
         return;
      m_symbol_label[i].Update(true);
   }
//--- Timeframes
   int tf=ArraySize(m_timeframes);
   ArrayResize(m_timeframe_label,tf);
//---
   for(int i=0; i<tf; i++)
   {
      if(!CreateTimeframeLabel(m_timeframe_label[i],110+65*i,m_step_window.CaptionHeight()+3,m_timeframes[i]))
         return;
      m_timeframe_label[i].Update(true);
   }
//-- Signal blocks
   int k=0;
   ArrayResize(m_signal_button,sy*tf);
   for(int j=0; j<sy; j++)
   {
      for(int i=0; i<tf; i++)
      {
         if(!CreateSignalButton(m_signal_button[k],m_timeframe_label[i].XGap()+m_timeframe_label[i].XSize()/2,m_step_window.CaptionHeight()+35+j*35))
            return;
         m_signal_button[k].Update(true);
         k++;
      }
   }
//---
   m_current_step=4;
//--- Resize window
   AutoResize(m_timeframe_label[tf-1].XGap()+m_timeframe_label[tf-1].XSize()+15,m_symbol_label[sy-1].YGap()+m_symbol_label[sy-1].YSize()+10);
监视器能实现更加方便地跟踪。

图例 10 调整信号区域大小,并调整监视器界面。
现在,我们实现打开所发现信号的品种+时间帧图表。 单击相应的区域即可打开图表。 在 OnEvent() 方法的按钮点击事件部分中添加以下内容(因为信号区域是按钮):
      //--- CLICKING ON THE SIGNAL BLOCK
      for(int i=0; i<ArraySize(m_signal_button); i++)
      {
         if(lparam==m_signal_button[i].Id())
            ChartOpen(GetSymbol(i),GetTimeframe(i));
      }
一切都十分简单。 至此,当前的开发阶段结束。 在下一部分中,我们将继续改进信号搜索系统,将介绍复合信号的概念,并会扩展监视器的控制功能。
下面的文档里包含所有讲述的文件,这些文件已正确地排列在文件夹当中。 为了正确操作,您应该将 MQL5 文件夹保存到终端的根目录中。 若要打开 MQL5 文件夹所在的终端根目录,请在 MetaTrader 5 终端中按 Ctrl+Shift+D 组合键,或利用关联菜单,如下图例 11 中所示。
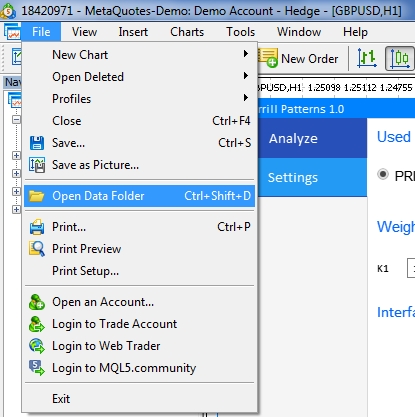
图例 11. 在 MetaTrader 5 终端根目录中打开 MQL5 文件夹

本社区仅针对特定人员开放
查看需注册登录并通过风险意识测评
5秒后跳转登录页面...
移动端课程
